
Stay Informed About Project Activity
A Track This / Closing Notice (aka: Notification Request) can be filed on an Appointment so that the subscriber will be notified if/when future activity on the project occurs.
QUICK FACTSStep 1 - Login
Sign up to use the LiensNC system or login with your existing user credentials. LOGIN | SIGN UP Step 2 - Locate the Project To file a Notification request, you must search for and link to the owner's Appointment filing. A couple of options are available for locating the correct Appointment, including:
|
QUICK FACTSDONE BY: Anyone interested in knowing about future project activity (Such as closing attorneys, settlement agents, lenders, banks, etc.) PURPOSE: To notify subscribers of project activity, including:
WHEN: Typically filed during the closing stage of the project after the initial Related Filings Report has been generated, or can be filed at any time during the project COST: $5 (fee waived for attorneys) 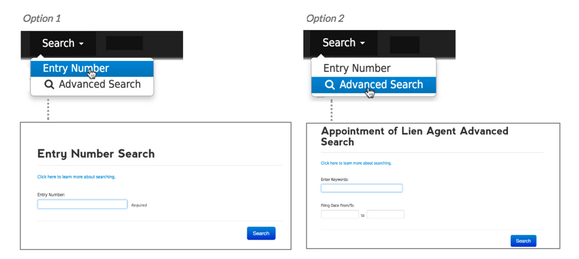
|
Step 3 - Link to Project
Once the Appointment is located, you can link your Notification Request to the project. The two methods for filing a Notification Request are based on your role in the project, and include:
Once the Appointment is located, you can link your Notification Request to the project. The two methods for filing a Notification Request are based on your role in the project, and include:
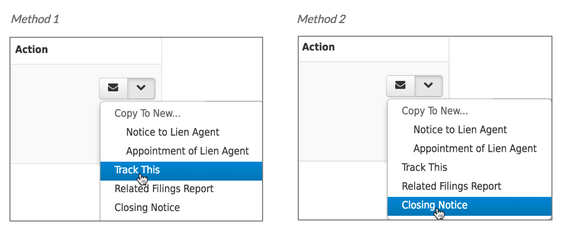
- METHOD 1 - TRACK THIS (for everyone except attorneys)
Once the Appointment you are linking to has been located, click on the Action drop-down arrow, and select the 'Track This' option. - METHOD 2 - CLOSING NOTICE (for attorneys only)
Once the Appointment you are linking to has been located, click on the Action drop-down arrow, and select the 'Closing Notice' option.
Step 4 - Enter Subscriber Email
Step 5 - Enter Payment Information
Step 6 - Automatic Notifications & Other Options
Upon successfully submitting the Notice filing, the LiensNC system will:
- Enter the subscriber's email address. (We ask that you enter it twice to help reduce the risk of user error.)
- Click on the Continue button.
- Verify the email address is correct. This is the last chance you will have to make any changes to the Notification Request.
If any changes need to be made, select the Edit option at the bottom of the page. - If everything is correct, click on the Pay Now button (for Track This requests) or the Continue button (for Closing Notice requests).
NOTE: YOU WILL NOT BE ABLE TO EDIT FILING INFORMATION AFTER THE NOTIFICATION REQUEST HAS BEEN SUBMITTED. HOWEVER, YOU WILL HAVE AN OPTION TO UNSUBSCRIBE AT ANY TIME SHOULD YOU NO LONGER WISH TO RECEIVE EMAIL ALERTS.
Step 5 - Enter Payment Information
- Select the payment method you will be using (Credit Card or eCheck) and click on the Continue button.
- Provide the customer billing information. (This information must match what your financial institution has on file.)
If paying by eCheck, provide the account information and click on the Continue button.
If paying by Credit Card, click on the Continue button, provide the account information and then click on the next Continue button. - If any errors are detected, you will receive a message at the top of the page and next to the affected fields that gives details about the issue(s) found. If applicable, you will need to correct any identified issues and then proceed with step 5.2.
- Once you have verified that the payment information you provided is accurate, select the Make Payment option.
- If there are any modifications that need to be made to the payment information, select the Edit option and continue with step 5.4
- If you wish to cancel the transaction and abort the Notification Request filing, click on the Cancel Payment button. NOTE: CANCELLING PAYMENT WILL PLACE THE FILING IN YOUR CART WHERE YOU CAN PAY FOR IT AT A LATER DATE. IF YOU WISH TO PERMANENTLY DELETE IT, YOU CAN DO SO FROM THE CART AREA.
Step 6 - Automatic Notifications & Other Options
Upon successfully submitting the Notice filing, the LiensNC system will:
- Send an email to the subscriber notifying them of any future involvement in the project.
- Advance the user to the History area of the account. This is where a listing of all your previously submitted filings can be found. Filing history entries are listed in sequential order, with the newest on top. Options users will find in this area include the ability to:
A) View the filing details.
B) Print the filing details.
C) Download a copy of the transaction receipt.
